Does your roof have a few worn-out or damaged shingles that are bringing down its overall appearance? Perhaps you’ve recently experienced a heavy storm or noticed some leakage, and now you’re wondering if you can replace just those troublesome shingles without undergoing the hassle and expense of a full roof replacement. Well, you’re in luck! In this article, we will delve into the topic of replacing individual roof shingles and explore whether it’s a viable option for your roof repair needs. From the different types of shingles to the steps involved in the replacement process, we’ve got you covered. So, let’s dive in and discover the ins and outs of this fascinating subject, empowering you to make informed decisions and restore the beauty and functionality of your roof.
Overview of individual roof shingle replacement process
Replacing individual roof shingles is a common practice in the roof repair industry. Whether it’s due to damage from a storm or general wear and tear over time, replacing shingles can help maintain the integrity and aesthetics of your roof. This process involves carefully removing the damaged shingles and replacing them with new ones, ensuring a seamless and secure fit.
Before you begin the process of replacing individual roof shingles, it is important to assess the extent of the damage and determine if it can be repaired or if replacement is necessary. Factors such as the age and condition of the roof, the type of shingles used, and the severity of the damage should all be taken into consideration.
To replace individual roof shingles, you will need a few essential tools such as a pry bar, hammer, roofing nails, and replacement shingles. It is also recommended to have safety equipment like gloves, safety glasses, and a stable ladder to ensure your well-being throughout the process.
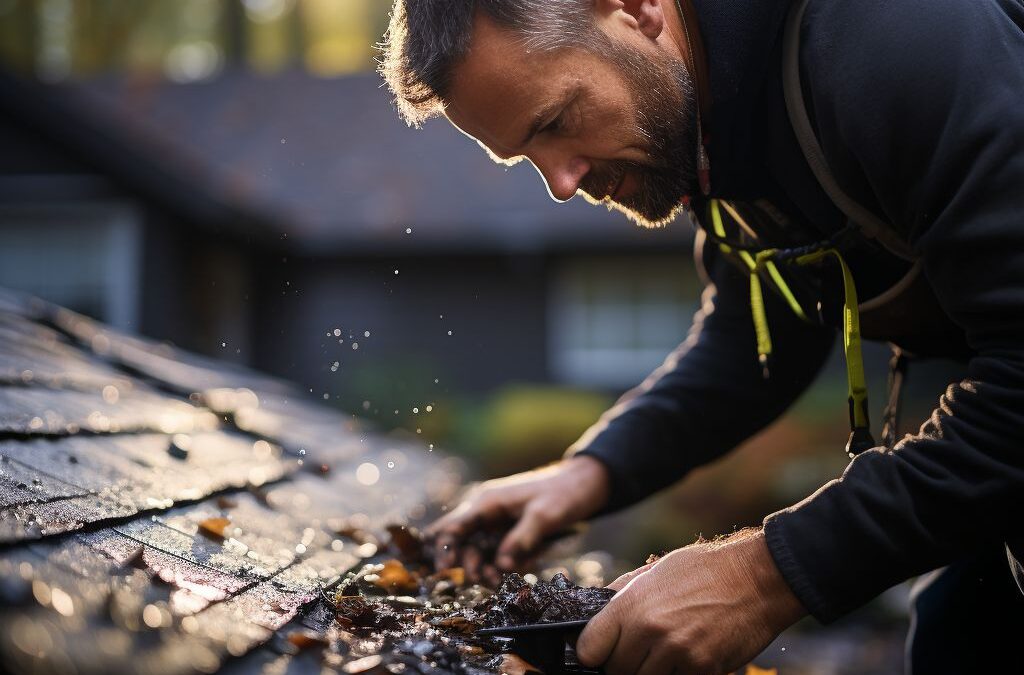
The first step is to carefully remove the damaged shingle by prying up the edges and pulling out the nails with a pry bar. Be cautious not to damage the surrounding shingles during this step. Once the damaged shingle is removed, you can clean the area and prepare it for the replacement shingle.
Next, position the replacement shingle in the vacant spot, making sure it aligns with the surrounding shingles. Secure it in place by hammering nails into the designated nail tabs along the top of the shingle, ensuring a tight and secure fit.
Repeat this process for each damaged shingle, giving attention to any specific guidelines provided by the manufacturer or any unique features of your roof. It is important to maintain a consistent pattern and alignment to maintain the overall visual appeal of your roof.
In conclusion, the process of replacing individual roof shingles involves assessing the damage, gathering the necessary tools and materials, carefully removing the damaged shingle, and securing the replacement shingle in place. Taking the time to complete this process correctly and paying attention to the details will ensure a successful repair and prolong the lifespan of your roof. However, if you are uncertain about your ability to complete the task, it is always recommended to seek professional assistance to guarantee the best possible outcome.
Factors to consider before replacing individual roof shingles
Replacing individual roof shingles can be a cost-effective solution for addressing specific damage and extending the lifespan of your roof. However, before diving into the process, there are several important factors to consider. Taking these factors into account will ensure that the replacement is successful and will help you avoid any potential complications down the line.
1. Assess the extent of damage: Before replacing individual roof shingles, it is crucial to assess the extent of the damage. Look for signs of wear and tear, such as cracked, curled, or missing shingles. Additionally, check for leaks or water damage in the area surrounding the damaged shingle. By thoroughly inspecting the roof, you can determine whether replacing just a few shingles will suffice or if there are underlying issues that need to be addressed.
2. Matching the existing shingles: It is essential to find replacement shingles that match the existing ones on your roof. Inconsistent shingles can affect the aesthetics of your home and may even impact the overall performance of your roof. Take note of the brand, color, and style of your current shingles and make sure to find an exact match. When shopping for replacement shingles, consult with a professional or bring along a sample to ensure a seamless blend.
3. Safety measures: Replacing individual roof shingles can be a risky task, especially if you are not experienced in working at heights. Before undertaking the project, evaluate your comfort level with climbing ladders and walking on a pitched roof. If you have any doubts, it is best to hire a professional roofing contractor who has the necessary tools, equipment, and expertise to complete the job safely.
By considering these factors, you can make an informed decision about replacing individual roof shingles. Remember, if you are unsure or uncomfortable with the process, it is always advisable to seek professional assistance. Taking the necessary precautions will help you protect your investment and ensure the longevity of your roof.
Step-by-step guide to replacing individual roof shingles
:
Replacing individual roof shingles can be a do-it-yourself project if you have the right tools and knowledge. Here is a step-by-step guide to help you successfully replace damaged shingles and ensure the longevity of your roof.
1. Safety First: Before you begin any roof repair project, it’s essential to prioritize your safety. Make sure to wear appropriate protective gear such as gloves, goggles, and non-slip footwear. Additionally, ensure that the weather conditions are favorable and stable, avoiding any risks of slipping or falling.
2. Assess the Damage: Start by identifying the specific shingles that need replacement. Look for signs of damage, such as cracks, curling, missing granules, or visible holes. It’s crucial to address these issues promptly to prevent further damage to your roof.
3. Gather the Necessary Tools: To replace individual roof shingles, you will need a few essential tools, including a pry bar, hammer, roofing nails, roofing adhesive or caulk, a utility knife, and replacement shingles that match the existing ones in both color and material.
4. Remove the Damaged Shingle: Use a pry bar to carefully lift the shingle above the damaged one. Gently remove any nails or fasteners holding the shingle in place. Once the damaged shingle is free, remove it entirely from the roof.
5. Prepare the Replacement Shingle: Use a utility knife to trim the replacement shingle to the appropriate size, ensuring it fits snugly into the space left by the damaged shingle. Apply a thin line of roofing adhesive or caulk along the backside of the shingle’s tabs to secure it in place.
6. Install the Replacement Shingle: Slide the replacement shingle into position, ensuring it aligns correctly with the surrounding shingles. Use roofing nails to secure the shingle in place, placing them near the edges and beneath the adhesive line. Be cautious not to drive the nails too tightly, as this can damage the shingle or create dimples.
7. Seal the Edges: To provide an extra layer of protection against water infiltration, seal the edges of the replacement shingle with a small amount of roofing adhesive or caulk. This will help prevent any future leaks and keep your roof in optimal condition.
Remember, if you feel uncomfortable or unsure about replacing individual roof shingles, it’s always best to seek professional assistance. They have the knowledge, experience, and equipment to ensure the job is done correctly and safely, minimizing the risk of further damage to your roof. By following this step-by-step guide, you can confidently tackle individual shingle replacement and maintain the integrity of your roof for years to come.
Common mistakes to avoid when replacing individual roof shingles
Replacing individual roof shingles can be a daunting task, especially for those with little to no experience in roof repairs. However, by avoiding common mistakes, you can ensure a successful shingle replacement and extend the lifespan of your roof. Here are some crucial mistakes to avoid:
1. Neglecting proper safety precautions
One of the most important aspects of replacing individual roof shingles is ensuring your safety. Many homeowners often neglect using proper safety equipment or tools, which can lead to accidents and injuries. Before starting any roofing project, always wear sturdy work boots, safety goggles, gloves, and a hard hat. If possible, secure yourself with a harness and work with a partner who can assist you from the ground.
2. Failing to inspect the underlying roof structure
When replacing individual roof shingles, it is crucial to inspect the underlying roof structure for any signs of damage or rot. Ignoring this step can result in a temporary fix that will likely lead to more significant problems in the future. Take the time to examine the area thoroughly and address any issues before proceeding with the shingle replacement.
3. Incorrectly matching shingles
Matching the new shingles with your existing roof is essential for a seamless appearance. One common mistake is selecting shingles that do not precisely match the color, style, or material of the existing ones. This mismatch can be immediately noticeable and compromise the overall aesthetics of your roof. Consult a roofing professional or bring a sample of your current shingle to ensure a proper match and seamless integration.
4. Poor installation techniques
The installation process plays a vital role in the longevity and effectiveness of your roof shingle replacement. Some common installation mistakes to avoid include not using enough roofing nails, improperly aligning the shingles, or neglecting to seal the edges with roofing cement. These errors can leave your roof susceptible to leaks, wind damage, and premature deterioration. Take the time to learn the proper installation techniques or, better yet, hire a professional to ensure a secure and long-lasting replacement.
By being aware of these common mistakes and taking the necessary precautions, you can successfully replace individual roof shingles and maintain the integrity of your roof. Remember, if you are unsure about any aspect of the process or want to guarantee the best results, it is always recommended to seek the assistance of a professional roofing contractor.
Choosing the right materials for individual roof shingle replacement
When it comes to replacing individual roof shingles, choosing the right materials is crucial for ensuring a long-lasting and effective repair. With a wide range of options available in the market, it’s important to consider factors such as durability, compatibility, and aesthetics when selecting the materials for the job.
One important aspect to consider is the type of shingles you will be replacing. Roof shingles come in various materials including asphalt, wood, metal, and slate. Each material has its own set of pros and cons, so it’s essential to choose one that suits your specific needs and preferences.
If you are replacing asphalt shingles, you’ll want to ensure that the new shingles match the existing ones in terms of color and texture. This will help maintain the overall aesthetics of your roof while also ensuring a seamless blend with the surrounding shingles. Paying attention to details like these can make a significant difference in the final appearance of your roof.
In addition to appearance, durability is another crucial factor to consider. You’ll want to choose shingles that are resistant to harsh weather conditions, such as extreme heat, heavy rain, and strong winds. Opting for high-quality materials that are known for their durability can help ensure that your roof remains intact and protected for years to come.
Lastly, it’s important to consider the compatibility of the chosen materials with your roof’s structure. Different roofing systems have different requirements, so it’s essential to select materials that are specifically designed for your type of roof. This will ensure a proper installation that minimizes the risk of leaks or other issues in the future.
To summarize, involves considering factors such as durability, compatibility, and aesthetics. By selecting materials that match the existing shingles, are resistant to harsh weather conditions, and are compatible with your roof’s structure, you can ensure a successful and long-lasting repair.
Importance of professional assistance for individual roof shingle replacement
Repairing or replacing individual roof shingles may seem like a straightforward task, but it’s important to recognize the significance of seeking professional assistance for this job. While it may be tempting to take on the project as a DIY endeavor, hiring a professional roofing contractor can provide numerous benefits and ensure the job is completed correctly and efficiently.
First and foremost, professional roofers have the experience and expertise necessary to assess the condition of your roof and determine whether individual shingle replacement is truly the best solution. They can identify any underlying issues that may be causing the shingle damage, such as leaks, rot, or structural damage. This comprehensive evaluation can prevent further problems from occurring and save you from future headaches and expenses.
Additionally, professional roofers have access to the highest quality materials and tools for shingle replacement. They are familiar with various types of shingles and can recommend the best options based on your specific needs, budget, and desired appearance. Using inferior materials can result in poor durability and aesthetics, potentially leading to frequent repairs or replacement in the future.
Furthermore, professional roofers follow industry standards and safety protocols during the replacement process. They have the necessary insurance coverage, permits, and licenses to ensure the work is done legally and safely. Climbing onto a roof can be dangerous, especially for someone without proper training and equipment. By entrusting the task to professionals, you can avoid potential accidents or injuries.
Lastly, hiring a professional roofing contractor for individual shingle replacement can save you valuable time and effort. They have the skills and tools to complete the job efficiently, minimizing disruptions to your daily routine. They can also handle any unexpected challenges that may arise during the project, ensuring a smooth and hassle-free experience for you.
In conclusion, while it may be tempting to tackle individual roof shingle replacement on your own, the importance of professional assistance should not be overlooked. Professional roofers offer invaluable expertise, quality materials, adherence to safety standards, and time-saving benefits. By choosing to hire a professional, you can ensure a successful roof repair and enjoy peace of mind knowing that your home is in capable hands.
People Also Ask
Yes, individual roof shingles can be replaced. If a shingle becomes damaged or worn, it can be removed and replaced with a new one without needing to replace the entire roof.
How do you replace a single roof shingle?
To replace a single roof shingle, start by lifting the edges of the shingle above using a pry bar, then remove the nails holding it in place. Slide the damaged shingle out and slide the new shingle into the same spot, aligning it with the neighboring shingles. Secure the new shingle by driving new nails through it and sealing the nail heads with roofing caulk.
Can you replace a shingle without removing the whole row?
Yes, it is possible to replace a single shingle without removing the whole row. By lifting the edges of the adjacent shingles, you can access and remove the damaged shingle without disturbing the rest of the row.
What tools are needed to replace individual roof shingles?
Tools required to replace individual roof shingles include a pry bar, a hammer, roofing nails, roofing caulk, and a utility knife. These tools are necessary to lift and remove the damaged shingle, secure the new shingle, and ensure proper installation.
Is it necessary to hire a professional to replace individual roof shingles?
Hiring a professional is not always necessary to replace individual roof shingles. If you have the necessary tools and skills, it can be a DIY project. However, if you are uncomfortable working at heights or lack experience, it may be advisable to hire a professional to ensure the job is done correctly and safely.
Closing Remarks
In conclusion, it is possible to replace individual roof shingles. This can be a cost-effective solution for minor damages, such as missing or damaged shingles. With the right tools and materials, homeowners can perform this task themselves or hire a professional for assistance.
However, it is important to consider the overall condition of the roof before deciding to replace individual shingles. If the roof is old or shows signs of significant wear and tear, it may be more practical to consider a full roof replacement rather than simply addressing isolated shingle problems.
Regular maintenance, such as inspecting and repairing shingles as needed, can help extend the lifespan of a roof and prevent more serious issues down the line. It is recommended to consult with a roofing professional if you are uncertain about the best course of action for your specific situation.
Remember, the key to maintaining a well-functioning roof is prompt attention to any damage or wear and tear. By taking proactive steps, you can ensure the longevity and effectiveness of your roofing system.

Roof Replacement Supervisor
Daniel Mitchell’s expertise lies in comprehensive roof replacements, utilizing top-quality materials to ensure durability and longevity. His meticulous approach and commitment to excellence make him a trusted professional.