Roof repair can often feel like a daunting task, especially for those who lack experience or knowledge in the field. However, when it comes to installing corrugated plastic roofing, fear not! With the right guidance and a bit of patience, this task can be tackled with relative ease. Whether you’re looking to add a shed or carport to your property, or even replace an old roof, corrugated plastic roofing offers durability, versatility, and a sleek modern aesthetic that can enhance any structure. In this article, we will guide you through the step-by-step process of installing corrugated plastic roofing, ensuring that you achieve a top-notch result that will stand the test of time. So, grab your tools and let’s get started!
Preparing for Installation
Before you begin installing corrugated plastic roofing for your roof repair project, it is important to properly prepare for the task at hand. This will ensure a smooth and successful installation process.
To start, gather all the necessary tools and materials you will need for the installation. These may include a tape measure, a saw or utility knife for cutting the panels, screws or nails for securing the panels, a drill or screwdriver, and a ladder or scaffolding for accessing the roof. Make sure you have everything readily available to prevent any delays or interruptions during the installation process.
Next, inspect your roof to ensure it is in good condition and can support the weight of the corrugated plastic roofing panels. Look for any signs of damage or decay, such as loose or missing shingles, rotting wood, or leaks. It is crucial to address any existing issues and make any necessary repairs before installing the plastic roofing panels. This will help prevent further damage and ensure a stable and secure installation.
Additionally, take into consideration any local building codes or regulations that may apply to your area. Some jurisdictions may have specific requirements for the installation of corrugated plastic roofing, such as minimum slope requirements or fire safety standards. Familiarize yourself with these regulations and ensure that your installation complies with them to avoid any legal issues down the line.
Lastly, ensure you have a clear plan in mind for the layout and design of your corrugated plastic roofing. Take measurements of the roof area where the panels will be installed, and calculate the number of panels you will need to cover the space. Consider factors such as the direction of water runoff, optimal placement for maximum sunlight exposure, and any architectural features of the roof that may affect the installation process.
By properly preparing for your corrugated plastic roofing installation, you can minimize potential setbacks and ensure a successful and long-lasting result. Take the time to gather all necessary tools and materials, inspect your roof for any damage, familiarize yourself with local regulations, and plan the layout and design of your roofing project. With these steps in place, you are ready to move on to choosing the right materials for your corrugated plastic roofing project.
Choosing the right materials for your corrugated plastic roofing project
is crucial to ensure its durability and longevity. The type of material you choose will depend on various factors such as the climate in your area, the purpose of the roof, and your budget.
One of the most popular options for corrugated plastic roofing is Polycarbonate. This material is known for its strength and durability, making it suitable for both residential and commercial roofing projects. It is also resistant to UV rays, which helps to prolong its lifespan. Another advantage of Polycarbonate is its lightweight nature, making it easier to handle and install.
Another option to consider is PVC (Polyvinyl Chloride) roofing. PVC is highly durable and resistant to weather damage, ensuring that your roof will last for many years to come. It is also a cost-effective option, making it suitable for those on a tight budget. PVC roofing is available in various colors and styles, allowing you to choose the one that complements the overall aesthetic of your property.
When choosing the right materials, it is also important to consider any additional accessories that may be required. For example, you may need ridge caps, foam closures, and screws specifically designed for corrugated roofing. These accessories help to provide a secure and watertight installation, protecting your property from leaks and damage.
It is recommended to consult with a professional roofing contractor or supplier to determine the best materials for your specific project. They can provide expert advice based on local weather conditions, building codes, and your individual requirements. By selecting the right materials, you can ensure that your corrugated plastic roofing project is a success and will provide reliable protection for years to come.
Measuring and cutting corrugated plastic roofing panels correctly
is a crucial step in ensuring a proper installation and a secure roof. Accurate measurements and precise cuts will not only make the installation process smoother but also result in a visually appealing and structurally sound roof.
When measuring the area where the corrugated plastic panels will be installed, it is important to take into account the slope of the roof. Start by measuring the length and width of the area, and then calculate the total square footage needed for the project. Remember to add a few extra inches to account for overhang and any potential errors during installation.
Once you have the accurate measurements, it is time to cut the corrugated plastic roofing panels to the desired size. To do this, you will need a circular saw with a fine-toothed blade or a utility knife. Before making any cuts, mark the measurements on the panels using a permanent marker or pencil.
When cutting the panels, it is essential to apply consistent pressure and follow the marked lines accurately. For a circular saw, use a straight edge to guide the blade and ensure a straight cut. If using a utility knife, score the panel along the marked lines multiple times until you can easily snap it apart. Always take caution when cutting and wear appropriate safety gear such as goggles and gloves.
Pro tip: If you need to cut notches or rounded edges on the panels, a jigsaw can be a handy tool. Just remember to use a blade specifically designed for cutting plastic to avoid any damage to the panels.
Once all the panels are cut to size, double-check the measurements and make any necessary adjustments before proceeding with the installation. This step will save you time and effort, ensuring that the panels fit seamlessly together and provide optimal protection for your roof.
Subheading: Handling and Storing Cut Panels
After cutting the corrugated plastic roofing panels, it is important to handle and store them properly to prevent any damage or warping. Avoid bending or flexing the panels excessively, as this can weaken their integrity and compromise their ability to withstand harsh weather conditions. Store the panels in a clean, dry area away from any sharp objects or heavy items that could cause unintentional damage.
Consider stacking the cut panels vertically, using some sort of spacer between each panel to prevent scratching or scraping. This method also allows air to circulate between the panels and minimizes the risk of warping. If you are storing the panels outdoors, protect them from direct sunlight by covering them with a tarp or similar protective material.
By following these guidelines, you can ensure that your corrugated plastic roofing panels are measured and cut correctly, allowing for a successful installation and a durable roof that will protect your home for years to come.
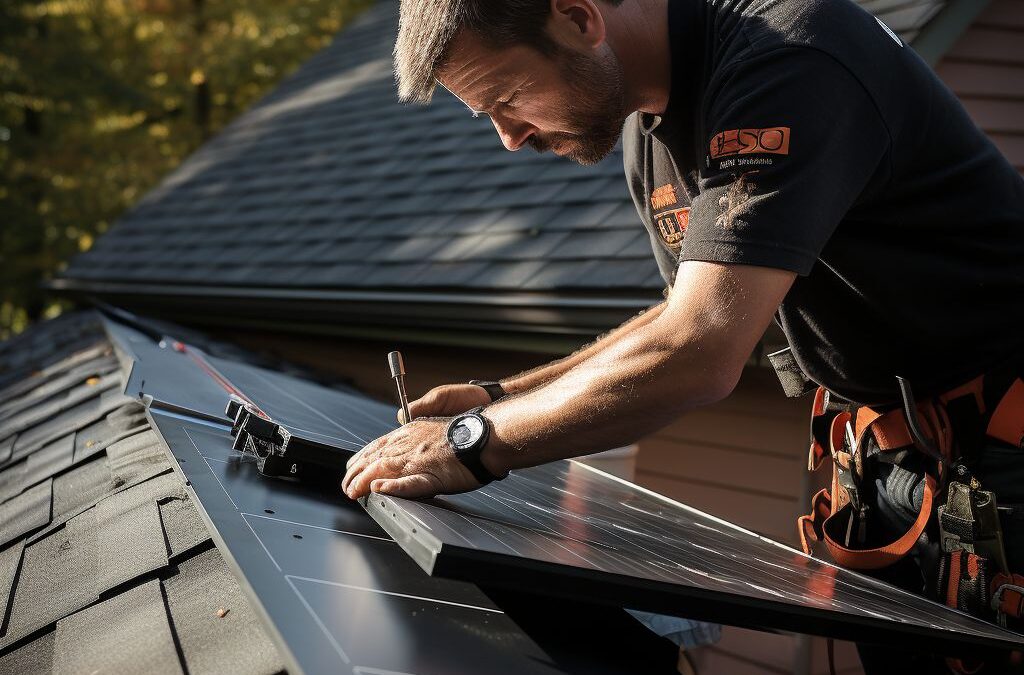
Installing corrugated plastic roofing panels securely
is crucial to ensure their longevity and effectiveness in protecting your roof. When properly installed, these panels can withstand various weather conditions and provide excellent durability. Here are some tips on securely installing corrugated plastic roofing panels:
1. Starting with a clean surface: Before you begin the installation process, make sure the roof surface is clean and free from any debris or dirt. Remove any existing roofing materials and sweep away any loose particles. This will help ensure a smooth and secure installation.
2. Use the right fasteners: It is essential to use the appropriate fasteners when securing the corrugated plastic roofing panels to your roof. Opt for screws or nails specifically designed for corrugated plastic materials. These fasteners should have a washer to prevent water infiltration and provide a secure anchor for the panels.
3. Proper spacing: When installing the panels, it is important to leave enough space between each panel to allow for thermal expansion and contraction. The manufacturer’s guidelines should provide the recommended spacing for your specific panels. Failing to leave enough space can lead to warping or buckling of the panels over time.
4. Secure the panels tightly: When attaching the panels to the roof, ensure that they are tightly secured. Use a screwdriver or drill to insert the fasteners through the pre-drilled holes in the panels and into the roof surface. Be careful not to overtighten the fasteners, as this can cause damage to the panels.
5. Consider adding support structures: Depending on the size and slope of your roof, it may be beneficial to install additional support structures to provide extra stability for the corrugated plastic roofing panels. This can be especially important in areas with high winds or heavy snowfall.
Remember to always follow the manufacturer’s instructions and guidelines when installing corrugated plastic roofing panels. Doing so will not only ensure a secure installation but also contribute to the overall lifespan and performance of your roof.
Sealing and waterproofing your corrugated plastic roofing
Properly is essential to ensure its longevity and protect your property from water damage. By following the right steps and using the appropriate materials, you can ensure that your roof remains watertight and withstands the elements for years to come.
To begin, your first step is to clean the corrugated plastic panels thoroughly before applying any sealants. Use a soft brush or cloth to remove any dirt, debris, or loose particles. This will ensure that the sealant adheres properly and forms a tight bond with the roofing material.
Next, carefully inspect the panels for any cracks or holes. Even the smallest gaps can lead to water leakage, so it’s crucial to address these issues before proceeding. Use a strong adhesive or plastic repair tape to fill in any gaps or seal off any areas that could potentially allow water penetration.
Once the panels are clean and any necessary repairs have been made, it’s time to apply a high-quality sealant. Opt for a sealant that is specifically designed for use on corrugated plastic roofing. These sealants are formulated to withstand the outdoor elements, including UV rays, extreme temperatures, and heavy rain.
Start by applying the sealant along the edges and seams of the panels, ensuring a proper seal. Use a caulking gun or a brush to apply the sealant evenly, making sure to cover any potential weak spots. Pay extra attention to the overlaps between panels, as this is a common area where water can seep through.
Additionally, it’s a good idea to reinforce the sealant by using self-adhesive flashing tape along the edges and seams. This added layer of protection will create an even stronger barrier against water infiltration.
To further enhance the waterproofing of your corrugated plastic roofing, consider adding a protective coating. There are various coatings available in the market that are specifically designed for plastic roofs. These coatings not only add an extra layer of waterproofing but also provide UV protection and extend the lifespan of your roof.
Remember, proper maintenance is key to ensuring the longevity of your corrugated plastic roof. Regularly inspect the roof for any signs of damage or wear, and promptly address any issues that arise. Keep an eye out for cracks, loose fasteners, or damaged sealant, as these can compromise the waterproofing of your roof.
In conclusion, is an essential step in ensuring its durability and protecting your property from water damage. By following the right steps and using the appropriate materials, you can create a watertight barrier that will withstand the test of time. Stay proactive in your roof maintenance, and your corrugated plastic roof will continue to provide reliable protection for many years to come.
Maintaining and extending the lifespan of your corrugated plastic roofing
Proper maintenance is essential to ensure the longevity and performance of your corrugated plastic roofing. By following a few simple guidelines, you can keep your roof in optimal condition and extend its lifespan.
Regular Cleaning: One of the first steps in maintaining your corrugated plastic roofing is to keep it clean. Dirt, debris, and moss can accumulate on the surface over time, leading to damage and deterioration. To clean your roof, use a soft-bristle brush or a pressure washer on a low setting. Avoid using abrasive cleaning agents or tools that may scratch or damage the plastic surface.
Inspect for Damage: Regular inspections are crucial to identify any signs of damage or wear on your corrugated plastic roofing. Look for cracks, holes, or loose fasteners that may compromise the integrity of the roof. Also, check for any areas where the plastic panels may have shifted or lifted, leaving gaps that could allow water to penetrate. Promptly repair any identified issues to prevent further damage.
Protect from UV Rays: Corrugated plastic roofing is susceptible to damage from UV rays, which can cause discoloration, brittleness, and weakness over time. To protect your roof from UV damage, apply a UV protective coating specifically designed for plastic materials. This coating acts as a barrier, reducing the impact of harmful UV rays and helping to maintain the structural integrity of the roofing.
Ensure Proper Drainage: Adequate drainage is essential to prevent water accumulation on your corrugated plastic roofing. Make sure that the gutters and downspouts are clear of debris and functioning properly. Additionally, ensure that the slope of your roof allows water to flow freely towards the gutters, preventing any water damage or pooling that can compromise the lifespan of the roofing.
Periodic Maintenance: In addition to regular cleaning, it is recommended to perform periodic maintenance tasks to keep your corrugated plastic roofing in optimal condition. This may include resealing any joints or seams, replacing worn or damaged fasteners, and addressing any signs of wear or weakness. By staying proactive with maintenance, you can address any issues early on and avoid more extensive repairs or replacement down the line.
By following these maintenance tips, you can extend the lifespan of your corrugated plastic roofing and ensure its continued performance. Regular cleaning, inspections, UV protection, proper drainage, and periodic maintenance will help to safeguard your roof against damage, enhancing its durability and longevity.
People Also Ask
1. How do you cut corrugated plastic roofing?
To cut corrugated plastic roofing, use a circular saw or a fine-toothed handsaw. Mark the line you want to cut, then carefully follow it with the saw, applying gentle pressure. Use a utility knife to complete any intricate cuts or trimmings.
2. What tools do I need to install corrugated plastic roofing?
The basic tools you’ll need to install corrugated plastic roofing include a drill, circular saw or handsaw, measuring tape, marking pencil, screwdriver, washers, and roofing screws. Additionally, you may need a ladder, safety goggles, and gloves to ensure a safe installation.
3. Can corrugated plastic roofing be installed over existing shingles?
No, it is not recommended to install corrugated plastic roofing over existing shingles. The existing shingles should be removed to ensure proper installation and prevent condensation issues. It is important to have a clean and even surface before installing corrugated plastic roofing.
4. How do I secure corrugated plastic roofing sheets?
To secure corrugated plastic roofing sheets, pre-drill holes on the panels using a drill with a bit slightly larger than the screw diameter. Place the sheets in position, aligning them properly, and secure them with roofing screws and washers. Make sure to space the screws properly according to manufacturer’s recommendations for better stability.
5. How do I prevent leaks in corrugated plastic roofing?
To prevent leaks in corrugated plastic roofing, it is crucial to properly seal the edges and overlap areas using silicone sealant or appropriate roofing tape. Ensuring proper installation, secure fastening, and correct placement of screws and washers can also help minimize the risk of leaks.
Insights and Conclusions
In conclusion, installing corrugated plastic roofing can be a simple and cost-effective way to enhance your outdoor space. By following the correct steps and using the necessary tools, you can easily complete this project on your own. It is important to carefully measure and cut the roofing panels to ensure a proper fit, and to securely attach them to the structure using the appropriate fasteners.
Remember to take safety precautions during the installation process, such as wearing protective gear and working on a stable surface. It is also recommended to consult with a professional or refer to the manufacturer’s instructions for specific guidance on your roofing project.
With the right preparation and attention to detail, you can successfully install corrugated plastic roofing and enjoy the benefits of a durable and lightweight roofing solution. Start planning your project today and transform your outdoor space with this versatile material.

Innovation and Technology Director
William Simmons is dedicated to bridging the gap between innovative roofing technologies and traditional craftsmanship. His focus on blending modern techniques with reliable practices ensures optimal results for our clients.