Driving an RV across the open road, wind in your hair, and a sense of freedom in your heart—it’s a dream many of us share. But can we talk about the nightmares that come with the territory? Specifically, the dreaded roof damage. Whether it’s due to hailstorm fury or a close call with a low-hanging tree branch, a damaged RV roof can put a dent in our travels and our wallets. But fear not! In this article, we will dive headfirst into the world of RV roof repair, arming you with the knowledge you need to tackle the task with confidence. So strap in, grab a cup of coffee, and get ready to restore your home on wheels to its former glory.
Roof damage signs: Identifying issues before repair
When it comes to repairing your RV roof, being able to identify roof damage signs early on is crucial. By catching issues before they escalate, you can save yourself time, money, and potential further damage to your RV. It’s important to regularly inspect your roof for any signs of damage, such as cracks, punctures, or leaks.
One of the most common signs of roof damage is water leaks inside your RV. These can manifest as stains on the ceiling or walls, or even puddles of water on the floor. Additionally, you may notice damp or musty odors, which can indicate the presence of hidden leaks. It’s essential to address leaks as soon as possible to prevent further damage to the interior of your RV.
Physical signs of damage on the roof surface should also be taken seriously. These can include cracks, punctures, or tears in the roofing material. Look for any areas that appear damaged, discolored, or weakened. Prolonged exposure to the sun, extreme weather conditions, or accidents can cause these types of issues. Taking the time to regularly inspect your roof can help you catch these problems early on.
To assist you in your roof inspection, consider using a sturdy ladder to access the roof safely. Inspect every inch carefully, looking for any signs of damage or wear. Take note of any areas that show signs of deterioration or where the roofing material seems to be pulling away from its original position. Remember, prevention is key, and catching roof damage early can help save you from more significant repairs down the line.
Key Points:
– Regularly inspect your RV roof for signs of damage, including water leaks, stains, or odor.
– Look for physical signs of damage, such as cracks, punctures, or tears.
– Safely access your roof using a ladder and conduct a thorough examination of the entire surface.
– Take note of any areas showing deterioration or separation of materials.
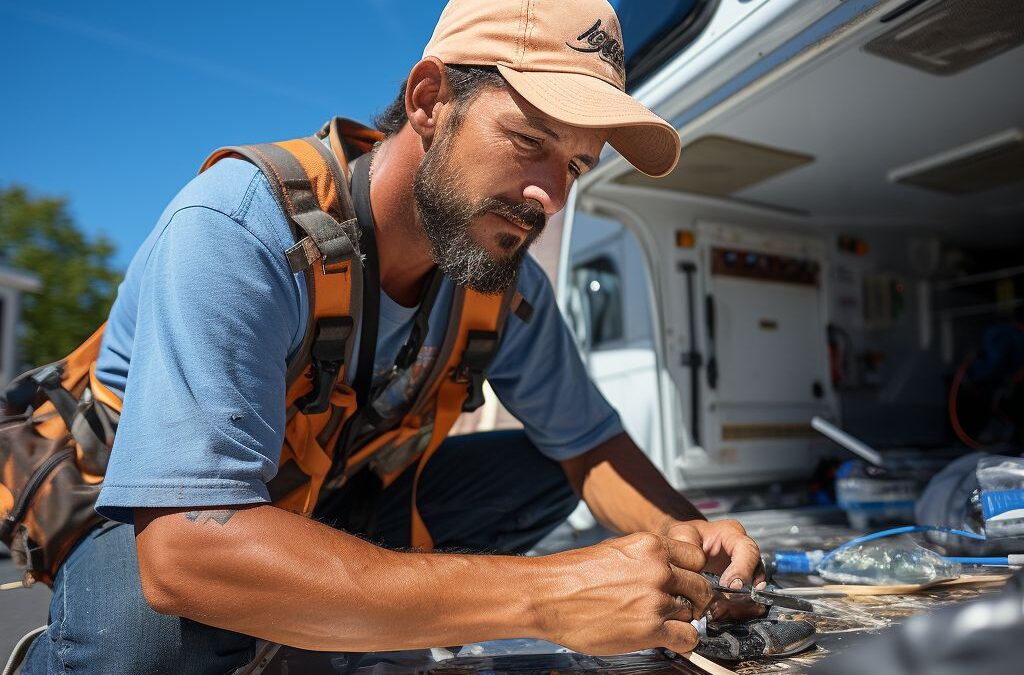
Preparation steps: Gathering necessary tools and equipment
Before you begin repairing your RV roof, it is important to gather all the necessary tools and equipment to ensure a smooth and efficient process. Having the right tools at your disposal will not only make the repair job easier but also help you achieve professional-looking results.
First and foremost, make sure you have a sturdy ladder or scaffolding that can safely reach the damaged area. Safety should always be a top priority when working on the roof of your RV. Additionally, you will need a good quality pair of work gloves to protect your hands from any sharp edges or rough surfaces.
Next, gather a variety of tools such as a utility knife, putty knife, wire brush, and a caulking gun. These tools will come in handy for removing any loose debris, scraping off old sealants, and applying new ones. Make sure the blades of your knives are sharp to ensure clean and precise cuts.
In terms of materials, be sure to have an ample supply of roof sealants, adhesives, and rubber patches. It is recommended to use high-quality products specifically designed for RV roof repairs, as they offer superior durability and weather resistance. Consider investing in self-leveling sealants that can provide an even and watertight seal, preventing any future leaks.
Finally, if you are planning on undertaking a more extensive repair job, you may need additional equipment such as a roof patching kit or replacement sections. These kits often include all the necessary materials, including step-by-step instructions, to help you successfully replace damaged sections of your RV roof.
By gathering the necessary tools and equipment beforehand, you are setting yourself up for a successful and efficient repair process. Remember to always prioritize safety and invest in high-quality materials to ensure a long-lasting repair.
Repairing small cracks and punctures: DIY techniques and materials
When it comes to repairing small cracks and punctures on your RV roof, you don’t always have to call in the professionals. With a little DIY knowledge and the right materials, you can fix minor damage on your own and save some money in the process.
One of the first steps in repairing small cracks and punctures is cleaning the damaged area. Use a mild detergent and water to remove any dirt, debris, or loose material. This will ensure that the repair materials adhere properly to the surface.
Next, you’ll want to assess the size and severity of the crack or puncture. If it’s a small crack or hole, you can usually fix it with a patch kit designed specifically for RV roofs. These kits typically include a peel-and-stick patch and a topcoat to provide added protection.
To apply the patch, carefully remove the backing and stick it directly over the damaged area. Use a roller or the back of a spoon to evenly apply pressure and ensure a tight bond. Once the patch is in place, apply the topcoat as directed by the manufacturer. This will help seal the edges of the patch and provide a waterproof barrier.
For larger cracks or punctures, you may need to use a more advanced repair method. One option is to use a roof repair tape or sealant. These products are typically self-adhesive and can be applied directly to the damaged area. Make sure to clean and prepare the surface before applying the tape or sealant, and follow the manufacturer’s instructions for best results.
Additionally, if the crack or puncture is near an edge or seam, you may need to reinforce it with a reinforcing strip or flashing. This will help prevent further damage and ensure a long-lasting repair.
By taking the time to repair small cracks and punctures on your RV roof, you can extend its lifespan and prevent further damage. Remember to always work on a clean surface, use the proper materials, and follow the manufacturer’s instructions for best results. With a little DIY know-how, you can keep your RV roof in great condition for years to come.
Replacing damaged sections: Steps for a professional repair
When it comes to repairing your RV roof, sometimes the damage is beyond the scope of simple patching and requires replacing whole sections. This is a more extensive repair process that should be done by a professional to ensure the best results. Here are the steps involved in replacing damaged sections of your RV roof:
1. Assess the extent of the damage: Before starting the repair process, it’s important to carefully assess the area that needs to be replaced. Look for any signs of water damage or rot, as these issues will also need to be addressed during the repair.
2. Remove the damaged section: Use a utility knife or a reciprocating saw to carefully cut out the damaged section of the roof. Take care to cut straight lines and avoid damaging any surrounding areas. This will ensure that the replacement section fits properly and securely.
3. Clean and prepare the area: After removing the damaged section, thoroughly clean the area to remove any debris or loose material. Use a strong cleaning solution and scrub brush to remove any dirt, grime, or old sealants. Once the area is clean, allow it to dry completely before proceeding.
4. Measure and cut the replacement section: Measure the size and shape of the section that needs to be replaced and transfer those measurements onto a new piece of roofing material. Use a circular saw or a table saw to carefully cut the replacement section, ensuring that it matches the dimensions of the removed section.
5. Install the replacement section: Apply a layer of roof adhesive or sealant to the area where the replacement section will be installed. Carefully position the replacement section onto the adhesive and press it firmly into place. Use screws or nails to secure the edges of the replacement section, making sure they are evenly spaced for a secure fit.
6. Seal and finish the repair: Once the replacement section is securely in place, apply a layer of roof sealant or adhesive along all edges and seams. This will ensure a watertight seal and prevent any future leaks. Allow the sealant to dry completely before exposing the roof to any moisture.
By following these steps, you can ensure a professional and effective repair when replacing damaged sections of your RV roof. Remember to prioritize safety and consult with a professional if the damage is extensive or if you are unsure about any part of the repair process. With the right tools, materials, and expertise, your RV roof will be restored to its former glory in no time.
Preventing future damage: Expert tips for maintaining your RV roof
To ensure the longevity and durability of your RV roof, it is crucial to implement a regular maintenance routine. By taking the necessary steps to prevent future damage, you can save yourself from costly repairs down the road. Our experts have compiled a list of valuable tips to help you maintain your RV roof and extend its lifespan.
Regular Cleaning:
One of the simplest yet most effective ways to maintain your RV roof is by regularly cleaning it. This involves removing debris, leaves, twigs, and other foreign objects that may accumulate over time. Use a soft brush or a broom with soft bristles to gently sweep away any loose dirt or debris. Avoid using harsh chemicals or abrasive cleaners, as they can damage the roof membrane. Instead, opt for mild soap and warm water to gently scrub away any stubborn stains.
Inspection and Repair:
Regularly inspecting your RV roof for any signs of damage is essential for maintaining its structural integrity. Look out for cracks, punctures, or signs of wear and tear. Inspect the seals around vents, skylights, and other roof openings to ensure they are tightly sealed. If you spot any issues, it is crucial to address them promptly to prevent further damage. Small cracks or punctures can often be repaired using DIY techniques and materials, as outlined in our previous section. However, for larger or more severe damage, it is advisable to seek professional repair services.
Protective Coatings and Sealants:
Another effective way to prevent future damage to your RV roof is by applying protective coatings and sealants. These products act as a barrier against the elements and help to extend the lifespan of your roof. Choose high-quality coatings and sealants that are specifically designed for RV roofs. Apply them as per the manufacturer’s instructions, ensuring full coverage and a proper seal. Regularly inspect and reapply these protective coatings as needed, especially after extreme weather conditions or prolonged exposure to the sun.
By following these expert tips for maintaining your RV roof, you can significantly reduce the risk of future damage and prolong the lifespan of your investment. Remember to adopt a regular cleaning and inspection routine, promptly address any signs of damage, and apply protective coatings and sealants as recommended. Taking these preventative measures will save you time, money, and stress in the long run, ensuring that your RV roof remains in top-notch condition for years to come.
Roof maintenance products: Choosing the right coatings and sealants
Roof maintenance products play a crucial role in protecting your RV roof from further damage and extending its lifespan. Choosing the right coatings and sealants is essential to ensure proper protection and long-lasting results. Here are some key factors to consider when selecting these products:
Type of Coating:
When it comes to coatings, there are various options available in the market, including acrylic, aluminum, elastomeric, and rubber-based coatings. Each type has its own set of advantages and disadvantages. Consider factors such as weather conditions, durability, flexibility, and ease of application before making your decision.
Sealant Compatibility:
Choosing a sealant that is compatible with your chosen coating is crucial for a successful repair. Different materials require specific types of sealants to ensure proper adhesion and prevent leaks. Make sure to read the manufacturer’s guidelines and recommendations to ensure compatibility between the coating and sealant you select.
Durability and UV Protection:
Since your RV roof is constantly exposed to the harsh elements, it’s crucial to choose a coating that offers excellent durability and UV protection. Look for products that are specifically designed to withstand sunlight, temperature changes, and frequent movement without cracking or peeling. UV protection is essential to prevent the coating from fading and deteriorating over time.
Application Method:
Consider the application method required for the coating and sealant you choose. Some products are easy to apply with a brush or roller, while others may require professional equipment or sprayers. Choose a product that matches your skill level and the resources available to you for a smoother application process.
Manufacturer Reputation:
When it comes to roof maintenance products, it’s crucial to choose a reputable manufacturer known for producing high-quality and reliable products. Look for reviews and recommendations from other RV owners or consult with professionals in the industry to ensure you’re investing in a trusted brand that stands behind its products.
Remember, proper application and maintenance are key to maximizing the lifespan of your RV roof. Regularly inspect your roof, clean it as needed, and apply coatings and sealants as recommended by the manufacturer. By taking these preventive measures and choosing the right products, you can ensure your RV roof remains in optimal condition for years to come.
People Also Ask
1. Can I repair RV roof damage myself?
Yes, you can repair minor RV roof damage yourself by using rubber or fiberglass patch kits and sealants. However, for major or extensive damage, it is recommended to consult a professional for a more thorough and lasting repair.
2. What materials are needed to repair RV roof damage?
Common materials needed for repairing RV roof damage include rubber or fiberglass patch kits, roof sealants, adhesives, a putty knife, cleaning supplies, and possibly a ladder or scaffolding, depending on the severity and location of the damage.
3. How much does it cost to repair RV roof damage?
The cost of repairing RV roof damage can vary depending on the extent of the damage and the materials needed for repair. Minor repairs can cost around $100-$300, while major repairs or complete roof replacements can range from $1,000 to $5,000 or more.
4. How long does it take to repair RV roof damage?
The time required to repair RV roof damage depends on the severity and extent of the damage, as well as the experience and skill level of the person doing the repair. Minor repairs can typically be completed within a few hours, while more complex repairs may take a day or two.
5. Can I prevent future RV roof damage?
Yes, there are preventive measures you can take to reduce the risk of future RV roof damage. Regularly inspect and maintain your RV roof, keep it clean and free from debris, apply protective coatings or sealants, and avoid parking your RV under low-hanging trees or near areas with potential hazards that could cause damage.
Wrapping Up
In conclusion, repairing RV roof damage is a crucial task to ensure the longevity and functionality of your recreational vehicle. It is important to promptly address any signs of damage, such as leaks, cracks, or missing sealant, to prevent further deterioration.
By following the steps outlined in this guide, you can confidently repair your RV roof damage. Remember to assess the extent of the damage, gather the necessary tools and materials, clean and prepare the damaged area, apply the appropriate sealant or patch, and finally, perform regular inspections and maintenance to prevent future issues.
Taking proactive measures to maintain your RV roof’s integrity will not only prolong its lifespan but also provide you with a stress-free journey on your next adventure. Keep in mind that if the damage seems extensive or beyond your expertise, it is always advisable to seek professional assistance.
Take charge of your RV’s roof health today and enjoy many more miles of worry-free travel experiences. Stay vigilant, and happy travels!

Climate Resilience Specialist
Christopher Clark’s extensive knowledge of Fresno’s unique climate challenges drives him to provide resilient roofing solutions. His commitment to community values and fair pricing makes him a trusted partner in roofing projects.