Whether you’re a seasoned road trip enthusiast or a weekend adventurer, your RV is undoubtedly your ticket to freedom on the open road. But as with any beloved investment, it requires regular maintenance to keep it in prime condition. One common issue that can plague RV owners is cracked caulking on the roof.
Without proper repair, these seemingly innocent fractures can quickly evolve into major leaks, causing costly damage and spoiling your outdoor escapes. But fear not!
In this article, we will guide you through the step-by-step process of repairing cracked caulking on your RV roof, ensuring your travels remain dry, secure, and hassle-free. So grab your tools and let’s get started on protecting your trusty home away from home!
Common Causes of Cracked Caulking on RV Roofs
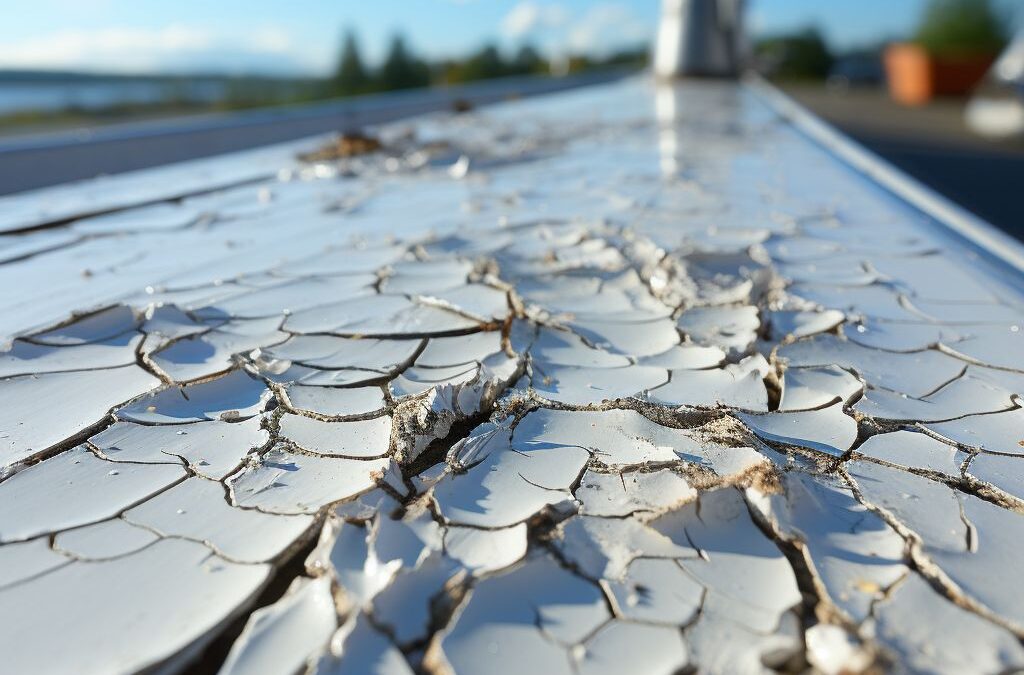
Cracked caulking on RV roofs is a common issue that many RV owners encounter. This can be caused by a variety of factors, ranging from normal wear and tear to extreme weather conditions. Understanding the common causes of these cracks can help you identify and address the problem in a timely manner.
One of the most is the natural aging process of the material. Over time, the caulking can become brittle and deteriorate, leading to cracks and gaps. Exposure to harsh weather conditions, such as extreme heat or freezing temperatures, can accelerate this deterioration process. Additionally, constant movement and vibrations while driving the RV can also contribute to caulking cracks.
Another common cause of cracked caulking is improper installation or inadequate sealing. If the caulking material was not properly applied or if there was not enough sealant used, it can lead to premature cracking. It is important to ensure that the caulking is evenly applied and covers all necessary areas to provide a tight seal.
Additionally, the type and quality of caulking used can also affect its longevity. Using low-quality caulking or using the wrong type for the specific roof material can lead to cracks and leakage. It is important to choose a caulking material that is specifically designed for RV roofs and is resistant to UV rays, temperature changes, and other environmental factors.
By understanding the , you can better prepare yourself to address and prevent these issues before they worsen. Regular inspections, maintenance, and applying the appropriate caulking material can go a long way in maintaining the integrity and longevity of your RV roof. Keeping your roof properly sealed not only protects your investment but also ensures a comfortable and leak-free travel experience.
Assessing the Extent of the Damage
Before diving into the repair process, it is crucial to assess the extent of the damage on the cracked caulking of your RV roof. This step will help you determine the appropriate repair method and materials required, saving time and effort in the long run.
Start by thoroughly inspecting the entire surface of the caulking. Look for any visible cracks, gaps, or sections where the caulking has peeled away. It’s essential to check both the roof and the areas where the roof meets other components, such as vents or skylights.
Next, carefully examine the surrounding areas for signs of water damage or leaks, such as discoloration, mold, or mildew. This will give you a better understanding of how long the caulking has been compromised and the potential extent of the underlying issues.
If the cracks in the caulking are minor and localized, you may be able to handle the repair yourself. However, if the damage appears extensive or structural in nature, it is advisable to seek professional assistance to ensure a proper and lasting fix.
Subheading: Using a Magnifying Glass for Detailed Inspection:
In some cases, cracks or gaps in the caulking can be difficult to spot, especially if they are small or hidden within the existing caulking. To conduct a thorough inspection, consider using a magnifying glass. This tool can help you identify even the tiniest imperfections that may be contributing to the damaged caulking.
Carefully examine the surface with the magnifying glass, paying close attention to areas where the caulking has previously been repaired to ensure there are no signs of reoccurrence. This extra level of scrutiny will enable you to address any potential weak spots and prevent future issues.
Remember, accurately is essential for selecting the right repair method and materials. A comprehensive inspection will empower you to address the problem head-on, ensuring the longevity and integrity of your RV’s roof.
Preparing the Surface for Caulking Repair
Before you can begin repairing cracked caulking on your RV roof, it’s crucial to properly prepare the surface. This step is essential for ensuring a strong and long-lasting repair.
First, start by thoroughly cleaning the area around the cracked caulking. Use a mild detergent and warm water to scrub away any dirt, grime, or debris. It’s important to remove any loose pieces of caulking as well as any remnants of old sealant. A clean surface will allow the new caulking to adhere effectively.
Next, use a solvent or rubbing alcohol to remove any remaining traces of old caulking from the cracks. This will help create a smooth surface for applying the new sealant. Be sure to follow the manufacturer’s instructions for using the solvent and always work in a well-ventilated area.
Once the surface is clean, dry it thoroughly. Any moisture trapped beneath the caulking can compromise the strength of the repair. Use a clean cloth or towel to ensure the surface is completely dry before moving forward.
To further enhance the adhesion of the new caulking, consider using a primer specifically designed for RV roofs. This will provide an extra layer of protection and ensure a strong bond between the surface and the sealant. Again, follow the manufacturer’s instructions when applying the primer.
Taking the time to properly prepare the surface for caulking repair is crucial for achieving a successful and durable repair. By thoroughly cleaning, removing old sealant, drying the surface, and applying a primer if needed, you’ll be setting the stage for a smooth and effective repair process.
Choosing the Right Caulking Material
is essential for repairing cracked caulking on an RV roof. The caulking material you select should be durable, weather-resistant, and compatible with the roof material of your RV.
When it comes to selecting the right caulking material, there are a few factors to consider. Firstly, consider the type of RV roof you have. Different roof materials, such as rubber, fiberglass, or aluminum, may require specific types of caulking. It’s important to choose a caulking material that is compatible with your specific roof type to ensure a proper seal.
Additionally, you’ll want to consider the climate and weather conditions that your RV will be exposed to. If you frequently travel in areas with extreme temperatures or high levels of precipitation, it’s important to choose a caulking material that can withstand these conditions. Look for caulking that is resistant to UV rays, temperature changes, and water damage.
Another factor to consider is the application method and ease of use. Some caulking materials come in tubes and can be easily applied with a caulk gun, while others may require mixing or special application tools. Consider your level of experience and comfort with different application methods when choosing a caulking material.
To find the best caulking material for your RV roof repair, it can be helpful to consult with a specialist or a professional in the RV industry. They can provide guidance and recommend specific products that are known to work well on RV roofs. Additionally, reading reviews and doing research online can give you an idea of the effectiveness and durability of different caulking materials.
Overall, is crucial for a successful RV roof repair. Consider your specific roof type, climate conditions, and ease of use when making your selection. With the right caulking material, you can ensure a reliable and long-lasting seal for your RV roof.
Step-by-Step Guide to Repairing Cracked Caulking on an RV Roof
Repairing cracked caulking on an RV roof is an essential task to maintain the integrity of your vehicle. Whether caused by age, weathering, or improper installation, cracked caulking can lead to water leaks and further damage if not addressed promptly. Here is a step-by-step guide to help you effectively repair cracked caulking on your RV roof.
- Assess the damage: Before beginning any repairs, thoroughly inspect the roof for signs of cracked caulking. Look for areas that appear weathered, brittle, or have visible cracks. Pay close attention to seams, vents, and any other potential entry points for water.
- Prepare the surface: Clean the area around the cracked caulking to ensure a proper bond with the new sealant. Use a mild soap and water solution to remove any dirt, debris, or loose caulking. Allow the surface to dry completely before proceeding with the repair.
- Choose the right caulking material: Selecting the appropriate caulking material is crucial for a long-lasting repair. Consider factors such as compatibility with your RV roof material, flexibility, and weather resistance. Silicone-based caulks are a popular choice for RV roofs due to their durability and ability to withstand extreme temperatures.
- Apply the caulking: Using a caulking gun, apply the new sealant evenly along the cracked area. Start by applying a thin bead of caulk directly onto the crack and then use a putty knife or your finger to spread and smooth it out. Make sure to cover the entire cracked section with a consistent layer of sealant.
- Let it dry: Allow the caulking to dry completely according to the manufacturer’s instructions. This is typically between 24 to 48 hours, but it is important to follow the specific recommendations for your chosen caulking material.
- Inspect and touch up: Once the caulking has dried, carefully inspect the repaired area for any missed spots or uneven application. Use a putty knife or your finger to touch up any areas that require additional caulk. Ensure that all cracks are fully sealed and the caulking is smooth and even.
By following these step-by-step instructions, you can effectively repair cracked caulking on your RV roof and prevent future water damage. Regularly inspecting and maintaining your caulking will help to extend the lifespan of your RV roof and keep it in optimal condition for your adventures on the road.
Tips for Preventing Future Caulking Issues on RV Roofs
To ensure a long-lasting and leak-free RV roof, it’s essential to take preventive measures to avoid future caulking issues. By following these tips, you can prolong the lifespan of the caulk and prevent cracks and leaks from appearing:
Regular Inspection: Perform regular visual inspections of your RV roof, paying special attention to areas with caulking. Look for any signs of cracking, peeling, or gaps in the caulk. It’s best to catch and fix these issues early on before they worsen.
Clean the Surface: Before applying new caulking or performing any repairs, thoroughly clean the surface to remove any dirt, debris, or old caulk residue. A clean surface ensures proper adhesion and prevents contamination that could lead to future caulking failure.
Choose the Right Caulking Material: When selecting caulk for your RV roof, opt for a high-quality, weather-resistant product designed specifically for outdoor use. Silicone-based caulks are commonly used for RV roofs due to their durability and flexibility.
Proper Application: When applying caulk, ensure that it is evenly spread across the surface and fills any gaps or cracks completely. Use a caulking gun for controlled application and a smooth finish. Allow the caulk to cure according to the manufacturer’s instructions before exposing it to water or other elements.
Regular Maintenance: Schedule regular roof maintenance, including resealing and recaulking as needed. Monitor the condition of the caulk and address any issues promptly. This proactive approach can save you from expensive repairs and potential water damage.
Protect from UV Rays: Exposure to sunlight can cause caulk to degrade over time. Consider using UV-resistant caulk or applying a protective coating over the caulking to extend its lifespan.
Mind the Temperature: Apply caulk when the weather conditions are optimal. Avoid extreme temperatures, as they can affect the curing process and compromise the integrity of the caulk. Consult the caulk manufacturer’s recommendations for temperature guidelines.
By following these preventive measures, you can keep your RV roof in top shape and minimize the risk of future caulking issues. Regular inspections, cleaning, proper application, and ongoing maintenance are key to protecting your RV from leaks and water damage. Remember, a well-maintained caulked roof is crucial for a comfortable and worry-free camping experience.
People Also Ask
1. Can I just apply new caulking over the cracks?
It is not recommended to apply new caulking over existing cracks, as it may not provide a proper seal. It is best to remove the old caulking, clean the area thoroughly, and then apply a new layer of caulking.
2. How do I remove the old caulking?
To remove the old caulking, you can use a caulk removal tool or a putty knife to scrape it away. Make sure to be gentle and avoid damaging the roof surface in the process.
3. What is the best caulking to use for RV roof repair?
For repairing cracks on an RV roof, it is recommended to use a high-quality, elastomeric roof sealant specifically designed for RVs. These sealants provide flexibility and durability to withstand the elements.
4. How should I prepare the roof before applying new caulking?
Prior to applying new caulking, make sure to clean the surface thoroughly using a roof cleaner or mild detergent. Remove any dirt, debris, or loose pieces of old caulking to ensure a proper bond between the new caulking and the roof.
5. Can I repair larger cracks with caulking alone?
For larger cracks on an RV roof, caulking alone may not be sufficient. In such cases, it is advisable to use a roof patch kit or consult a professional to ensure a proper repair and prevent further damage.
Conclusion
In conclusion, repairing cracked caulking on an RV roof is a crucial maintenance task to ensure the longevity and integrity of the vehicle. By following these simple steps, you can easily fix any cracks in the caulking and prevent further damage. Remember to thoroughly clean the area, remove any old caulking, and apply a new bead of high-quality RV roof sealant. Regular inspection and maintenance will help extend the lifespan of your RV roof and prevent costly repairs down the line.
Take the time to examine your RV roof for any signs of cracked caulking and address the issue promptly. By maintaining your roof’s caulking, you’ll protect against water leaks and potential structural damage. Don’t neglect this important maintenance task, as it plays a significant role in preserving the overall condition of your RV. Keeping your roof in top shape will ensure that you can enjoy many more adventures on the road. Happy travels!

Innovation and Technology Director
William Simmons is dedicated to bridging the gap between innovative roofing technologies and traditional craftsmanship. His focus on blending modern techniques with reliable practices ensures optimal results for our clients.