Standing seam metal roofs have gained immense popularity in the roofing industry due to their durability, sleek appearance, and ability to withstand the harshest weather conditions. If you’re looking to upgrade your existing roof or install a new one, opting for a standing seam metal roof might just be the perfect choice. But before you embark on this exciting project, it’s essential to have a solid understanding of the installation process to ensure your roof not only looks great but also performs optimally for years to come. In this article, we’ll guide you through the step-by-step process of installing a standing seam metal roof, providing valuable insights, tips, and techniques that will enable you to successfully complete this project with confidence. So buckle up and get ready to discover the key steps and considerations to achieve a flawless and long-lasting standing seam metal roof installation.
Selecting the Right Metal Roofing Material for Your Standing Seam Roof
is crucial in ensuring a durable and long-lasting installation. With a wide range of options available, it can be overwhelming to know where to begin. However, by considering factors such as durability, aesthetics, and budget, you can make an informed decision that meets your specific needs.
When choosing a metal roofing material, durability should be a primary consideration. You want a material that can withstand harsh weather conditions, such as strong winds, heavy rain, and snow. Look for metal options that have a high resistance to corrosion and are capable of withstanding the test of time.
Aesthetics also play a significant role in choosing the right roofing material. While metal roofs are often associated with an industrial or modern look, they come in various colors and finishes that can complement any architectural style. You can opt for a classic silver or charcoal gray, or even choose from a range of bold and vibrant colors to make a statement.
Budget is another important factor to consider. While metal roofing materials may have a higher upfront cost compared to traditional roofing options, they offer excellent durability and require minimal maintenance. Additionally, the long-term energy efficiency benefits of a metal roof can lead to significant savings on utility bills in the future.
When selecting the specific metal roofing material, some popular options to consider include aluminum, steel, copper, and zinc. Aluminum is lightweight and corrosion-resistant, making it an ideal choice for coastal areas. Steel is known for its strength and affordability, while copper is highly durable and develops an attractive patina over time. Zinc is a premium option that offers exceptional weather resistance and longevity.
Ultimately, the right metal roofing material for your standing seam roof depends on your unique requirements and preferences. Take the time to research and compare different options, and consult with a professional to ensure you make an informed decision that suits your needs and budget. Remember, investing in a high-quality metal roof will not only protect your home but also enhance its overall curb appeal for years to come.
Preparation: Gathering the Tools and Materials You’ll Need
In order to successfully install a standing seam metal roof, it’s important to start off on the right foot with proper preparation. This involves gathering all the necessary tools and materials that you’ll need to complete the installation smoothly.
When it comes to the tools, you’ll need a variety of items to ensure a successful installation. These include a tape measure, chalk line, roofing hammer or nail gun, metal snips, a drill with metal bits, roofing screws, a ladder or scaffolding, and safety equipment such as gloves and goggles. These tools will help you accurately measure and cut the metal panels, secure them to the roof, and ensure your safety throughout the installation process.
In addition to tools, you’ll also need to gather the necessary materials for installing a standing seam metal roof. This includes the metal panels themselves, which can be ordered in various lengths according to the size of your roof. You’ll also need underlayment, which serves as a protective layer between the metal and the roof decking, preventing moisture from seeping through. Other materials include flashing, which helps to channel water away from seams and edges, as well as screws or clips for securing the panels in place.
By gathering all the tools and materials needed for the installation in advance, you’ll be well-prepared to start the process smoothly and efficiently. This will ensure that you have everything you need at your fingertips and minimize any potential delays or interruptions during the installation. So take the time to gather your tools and materials, and you’ll be ready to move on to the next step of removing the existing roofing materials and inspecting the decking.
Removing the Existing Roofing Materials and Inspecting the Decking
When installing a standing seam metal roof, the first step is to remove the existing roofing materials and inspect the decking. This is a crucial stage as it allows you to identify any underlying issues that need to be addressed before proceeding with the installation process.
Before you begin the removal process, ensure that you have all the necessary tools and equipment at hand. This may include a pry bar, hammer, roofing shovel, and safety equipment such as gloves and goggles. It’s also important to have a waste disposal plan in place to properly dispose of the old roofing materials.
Start by carefully removing the old shingles or roofing materials, taking care not to damage the deck in the process. Pay close attention to any areas that show signs of rot, water damage, or sagging. If you come across any issues, it may be necessary to repair or replace damaged decking before proceeding.
Once the old roofing materials have been removed, thoroughly inspect the deck for any remaining debris or nails. It’s important to have a clean and smooth surface for the installation of the underlayment and standing seam panels.
Inspecting the decking also provides an opportunity to assess the overall structural integrity of the roof. Look for any signs of deterioration, such as weakened or cracked boards, and address them before moving forward. Any necessary repairs should be made to ensure a solid foundation for the new metal roof.
Remember, a proper inspection of the decking is vital to the success and longevity of your standing seam metal roof. By addressing any issues or concerns during this stage, you can ensure that your new roof is installed on a solid and secure foundation.
Installing the Underlayment: Protecting Your Roof Against Moisture
When it comes to installing a standing seam metal roof, one crucial step that should not be overlooked is the installation of the underlayment. The underlayment plays a vital role in protecting your roof against moisture, ensuring that your home remains dry and free from damage. Below, we will guide you through the process of installing the underlayment, making sure you have all the information you need to successfully complete this crucial step.
Before you begin installing the underlayment, it is essential to gather all the necessary tools and materials. These typically include a utility knife, roofing nails, a hammer, a tape measure, chalk line, and the underlayment material itself. It is important to choose a high-quality underlayment material that offers excellent water resistance and durability, as this will provide the best protection for your roof.
Once you have gathered all the necessary tools and materials, you can begin the installation process. Start by thoroughly cleaning the roof surface, ensuring it is clear of any debris or dirt. Next, measure the roof surface to determine the amount of underlayment material needed. Cut the underlayment into appropriate-sized sections, leaving a 6-inch overhang along the edges.
Lay the first section of underlayment horizontally along the bottom edge of the roof, ensuring it is aligned properly. Secure it in place using roofing nails, making sure to follow the manufacturer’s guidelines for nail spacing. Repeat this process for the remaining sections, overlapping each piece by a few inches to create a watertight seal. Taking the time to properly overlap the underlayment is crucial in preventing any potential leaks or water damage.
In addition to the horizontal underlayment sections, it is also essential to install vertical underlayment along the roof’s edges. This will provide added protection against wind-driven rain and potential leakage. Secure the vertical underlayment sections in place using roofing nails, ensuring they are properly aligned and overlap the horizontal sections.
By following these steps and properly installing the underlayment, you can effectively protect your standing seam metal roof against moisture. This will not only increase the lifespan of your roof but also provide peace of mind knowing that your home is shielded from potential water damage. Remember to always follow the manufacturer’s guidelines and consult with a professional if you are unsure about any step in the process.
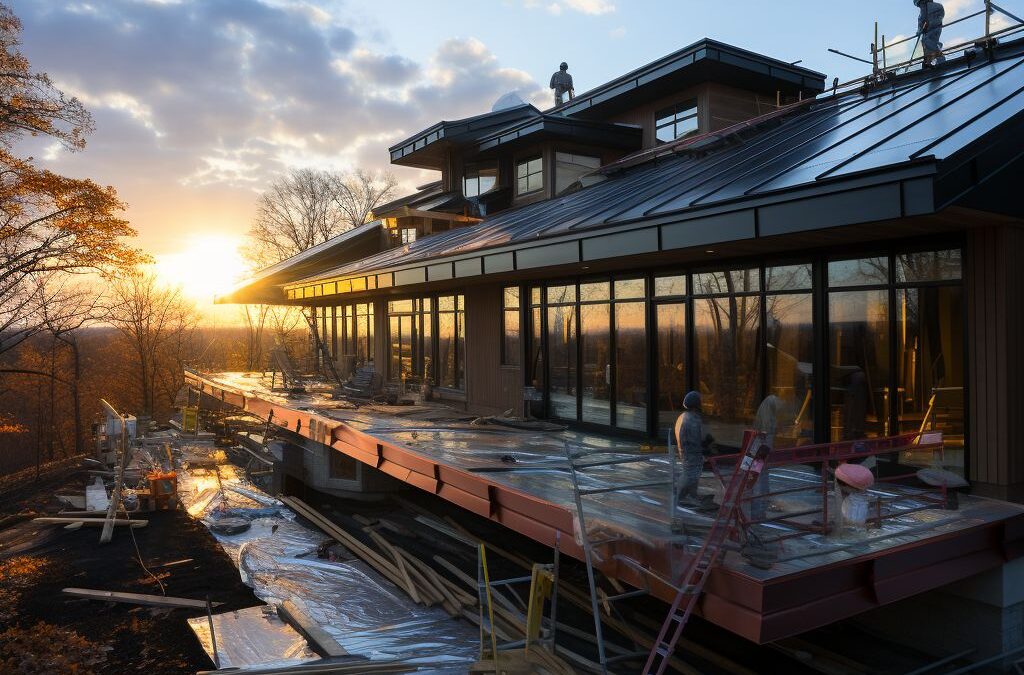
Step-by-Step Guide to Installing a Standing Seam Metal Roof
Installing a standing seam metal roof is a complex process that requires careful planning and attention to detail. This step-by-step guide will walk you through the process to ensure a successful installation.
First, it’s important to gather all the necessary tools and materials for the project. This includes a measuring tape, chalk line, drill, metal shears, roofing nails, and panels. Make sure you have all the necessary safety equipment as well, such as gloves and safety goggles.
Once you have everything prepared, the next step is to remove any existing roofing materials and inspect the decking. This is crucial to ensure that the roof is structurally sound before proceeding with the installation. Look for any signs of rot or damage and make any necessary repairs before moving on to the next step.
Next, you’ll need to install the underlayment to protect your roof against moisture. This is typically a layer of felt or synthetic material that is applied to the decking. Start at the bottom of the roof and work your way up, overlapping each row by a few inches to create a watertight seal.
Now it’s time to start installing the standing seam metal roof panels. Begin by measuring and cutting the first panel to the appropriate length. Use a chalk line to mark where the panel will be placed and then secure it to the decking using roofing nails. Repeat this process for each panel, making sure to leave a small gap between each one for expansion and contraction.
As you install the panels, it’s important to also install the flashing. This is a critical step that helps to prevent leaks and ensure a watertight roof. Flashing is typically installed at the seams and around any protrusions such as chimneys or vents. Follow the manufacturer’s instructions for the specific type of flashing you are using to ensure proper installation.
Finally, once the standing seam metal roof is installed, it’s important to properly maintain and upkeep it to extend its lifespan. This includes regular inspections for any damage or corrosion, cleaning off any debris or leaves, and making any necessary repairs as soon as possible.
Installing a standing seam metal roof can be a complex and time-consuming process, but with the right tools and materials, as well as careful attention to detail, it can be a rewarding DIY project for homeowners. By following this step-by-step guide and taking necessary precautions, you can ensure a long-lasting and durable roof that will protect your home for years to come.
Securing the Panels and Installing the Flashing: Critical Steps for a Watertight Roof
In order to ensure a watertight roof, it is crucial to properly secure the panels and install the flashing. These steps are essential to prevent water from penetrating the seams and causing leaks. By following the correct procedures, you can ensure the long-term durability of your standing seam metal roof.
To start, secure the panels by using specialized clips or brackets designed for standing seam roofs. These clips will attach the panels to the roof deck, providing secure and stable support. Make sure to position the clips according to the manufacturer’s instructions, ensuring they are evenly spaced across the roof.
Once the panels are securely fastened, it’s time to focus on installing the flashing. Flashing is vital for redirecting water away from vulnerable areas, such as roof valleys, chimney and skylight openings, and roof-to-wall transitions. It acts as a barrier, preventing water from seeping into these critical junctures.
Begin by installing the base flashing along the eaves of the roof. This flashing should be placed on top of the underlayment, with one edge extending over the edge of the roof. Secure it using roofing nails or appropriate fasteners, making sure it is properly aligned and level.
Next, install the sidewall flashing along the vertical walls of the roof. This flashing should overlap the base flashing, providing a seamless connection. Secure it in place using the recommended fastening system.
As you continue, make sure to install step flashing around any roof openings or protrusions, such as chimneys or vents. This flashing should be properly integrated with both the panels and the surrounding flashing, creating a continuous barrier against water intrusion.
Remember to follow the manufacturer’s instructions for each type of flashing, as different materials may have specific installation requirements. Take care to seal all seams and connections, using sealants or adhesives as recommended.
By securing the panels and installing the flashing correctly, you are taking critical steps towards achieving a watertight roof. These measures will help safeguard your home against leaks, while also ensuring the longevity of your standing seam metal roof.
Maintenance and Upkeep: Extending the Lifespan of Your Standing Seam Metal Roof
Proper maintenance is essential in ensuring the longevity and performance of your standing seam metal roof. With regular care and attention, you can extend its lifespan and avoid costly repairs or replacements. Here are some important steps you can take to maintain and protect your standing seam metal roof.
1. Inspect Regularly: Conduct routine inspections of your standing seam metal roof to identify any signs of damage or wear. Look for loose or damaged panels, dents, rust spots, or missing fasteners. Additionally, check for any debris that may have accumulated on the roof surface. Regular inspections allow you to address any issues promptly, preventing them from escalating into more significant problems.
2. Clean Debris: Remove any debris, such as leaves, twigs, or dirt, that accumulate on your roof. This can be done using a leaf blower or a soft brush to gently sweep away the debris. Accumulated debris can trap moisture and compromise the roof’s integrity. Regular cleaning prevents this and helps maintain the roof’s proper drainage.
3. Clear Gutters and Downspouts: Keep your gutters and downspouts clear of debris to ensure proper water flow. Clogged gutters can cause water to back up onto the roof, leading to potential water damage and leaks. Regularly remove leaves, twigs, and any other debris from your gutters and downspouts to maintain their functionality and prevent water from pooling on the roof.
4. Address Rust or Corrosion: Standing seam metal roofs are durable, but they can still be susceptible to rust or corrosion. If you notice any signs of rust or corrosion, it’s crucial to address the issue promptly. Use a wire brush or abrasive pad to remove the rust, and then apply a rust-inhibiting primer and paint to protect the affected area. Regularly inspect your roof for signs of rust and address them as soon as possible to prevent further damage.
5. Trim Overhanging Branches: Trees near your roof can pose a risk to your standing seam metal roof. Overhanging branches can scratch or damage the metal panels, particularly during high winds. Regularly trim any branches that hang over your roof to prevent them from causing harm. This simple step can help maintain the integrity of your roof and prevent potential leaks or punctures.
By following these maintenance practices, you can maximize the lifespan of your standing seam metal roof and ensure its continued performance and durability. Regular inspections, cleaning, and addressing any issues promptly will help protect your investment and prevent costly repairs down the line.
People Also Ask
1. What are the steps to install a standing seam metal roof?
To install a standing seam metal roof, you need to start by preparing the roof surface, applying underlayment, and installing the metal panels. This is followed by securing the panels using concealed fasteners, finishing the edges, and sealing any vulnerable areas to ensure water-tightness.
2. How long does it take to install a standing seam metal roof?
The installation time for a standing seam metal roof can vary depending on factors such as roof size, complexity, and the experience of the installer. However, on average, a professional roofing crew can typically complete the installation of a standing seam metal roof within a few days to a couple of weeks.
3. What tools are needed for installing a standing seam metal roof?
Some tools that are commonly used to install a standing seam metal roof include a drill, wrench, metal roofing seamer, roofing shears, snips, tape measure, chalk line, and safety equipment such as gloves and goggles. It’s important to use the appropriate tools and equipment to ensure a proper installation.
4. Can a standing seam metal roof be installed over an existing shingle roof?
Yes, in some cases, a standing seam metal roof can be installed over an existing shingle roof. However, it is essential to evaluate the condition and structural integrity of the existing roof before deciding to install the metal roof over it. It’s recommended to consult with a professional roofer to determine if this is a suitable option for your specific situation.
5. Are there any specific maintenance requirements for a standing seam metal roof?
A standing seam metal roof generally requires minimal maintenance. Regular inspections to check for any loose or damaged panels, cleaning off debris or leaves, and clearing gutters can help ensure its longevity. Additionally, promptly addressing any potential issues, such as areas with deteriorating sealant or potential leaks, will help maintain the roof’s performance over time.
In Summary
In conclusion, installing a standing seam metal roof can be a complex process, but with proper planning and preparation, it can be accomplished successfully. It is important to carefully measure and calculate the material needed, and to ensure that all necessary equipment and tools are readily available.
The installation process involves attaching the metal panels to the roof deck, using specialized clips and fasteners that allow for expansion and contraction. Proper sealing and flashing techniques should also be employed to ensure a watertight and durable roof system.
Remember to follow all safety precautions, such as wearing appropriate protective gear and working with a partner when necessary. If you are not confident in your DIY skills, it is recommended to hire a professional roofing contractor who is experienced in installing standing seam metal roofs.
By following these guidelines, you can enjoy the benefits that a standing seam metal roof provides, such as durability, energy efficiency, and an aesthetically appealing appearance. Take the time to research and plan your installation carefully, or seek assistance from a professional, to ensure a successful and long-lasting result.

Alexander Johnson is a seasoned roofing professional with over 25 years in the industry and CEO at Fresno Roof Repair. His expertise blends traditional craftsmanship with cutting-edge technology, focusing on resilient roofing solutions tailored to Fresno’s diverse climate. As a leader at Fresno Roof Repair, Alexander emphasizes open communication, teamwork, and continual education, ensuring every client receives exceptional service. Beyond his role, Alexander is deeply committed to the Fresno community, supporting local initiatives. His dedication, technical proficiency, and customer-centric approach make him an invaluable asset to Fresno Roof Repair, embodying the company’s commitment to excellence and quality roofing solutions.